In this project, we are going to build a Wireless FM Transmitter that uses RF communication. This RF communication helps to transmit medium or low-power FM signals. The maximum transmission range in this project is approx 100 metres.
CAUTION: Before going to make this project, I want to suggest that in some countries, it has strictly prohibited. So use it only for educational purposes.
Principle Behind This FM Transmitter
This circuit is divided into three parts. These are audio pre-amplification, modulation and transmission. I started in the same sequence by amplifying the audio signal. Then generate a carrier signal using an oscillating circuit and modulate the carrier signal with the amplified audio. I did the amplification with an amplifier. On the other hand, the modulation and carrier signal generation is done by a variable frequency oscillator. The frequency range is set to between 88 MHz and 108 MHz. The audio signal from the microphone is very low frequency (mill volts range). So this voltage needs to be amplified. A class A amplifier is used here by a common emitter configuration to amplify the inverted signal.
The second main part is the oscillator circuit. Here we used an LC oscillator circuit. In this type, the energy moves back and front between the inductor and capacitor to perform the oscillation. The RF communication is done here.
When the oscillator is given an input voltage, a modulated signal is then produced. Because the output signal is a mixture of the input signal and the oscillating signal.
Must Read Wireless Communication
Project

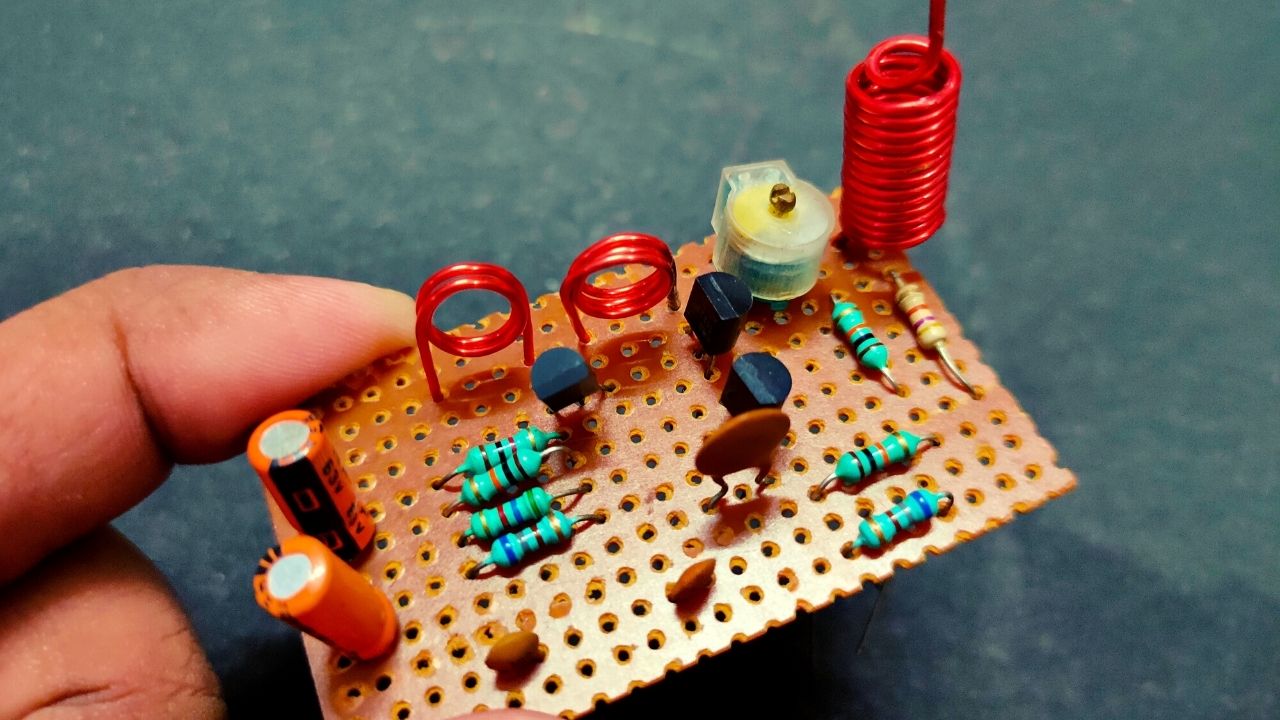
Circuit Diagram

Components Required
- Microphone
- BC109 Bipolar Junction Transistor
- 2N2222 Transistor
- 30 Inches Long Wire or Telescopic Antenna
- 20pF Variable Capacitor (x2)
- 5uF/16V, 47uF/16V, 0.01uF/16V, 15uF/16V Electrolytic Capacitor
- 0.01uF, 10pF Ceramic capacitors
- 0.2uH Inductor (x2)
- 18KΩ, 90KΩ, 5KΩ, 22KΩ, 9KΩ, 40KΩ, 1KΩ, 20KΩ Resistors
- 540Ω Resistor
- 9V Battery
Circuit Connection
Design of Audio Pre-amplifier
In this circuit, we are using a simple single-stage common emitter amplifier as a preamplifier.
At first, we select the BC109 which is an NPN bipolar junction transistor. The VCEO of this transistor is 40V. So we take a 9V battery as a lesser VCC. After making the preamplifier, we started the calculation for the load resistor. This calculation needed the value of the quiescent collector current. Let the value be 1mA. The collector voltage must be half of the VCC. So the value of the load resistor we get is Vc/Iq = 4.5KΩ. Instead of this, we use a 5KΩ resistor.
Then we take R2 and R3 as voltage divider resistors. To calculate the value of R2 and R3, we need to calculate the bias current across the resistors. Here we can see the bias current is about 10 times the base current. We know the base current (Ib) is equal to the ratio of the collector current and the current gain (hfe). After all of this, we get the value of Ib = 0.008mA. So the bias current is 0.08mA.
The base voltage (Vb) is to be 0.7V more than the emitter voltage (Ve). Then we assume the emitter voltage to be 12% of VCC or 1.08V. So we get the Vb = 1.78V.
So R2 = Vb/Ib = 22.25KΩ. We select a 22KΩ resistor for this. R3 = 90.1KΩ. We select a 90KΩ resistor for this. The value of the emitter resistor (R5) is Ve/Ie. Where Ie is the emitter current. Here the emitter current is nearly equal to the collector current. So R5 = 540Ω. We select a 500Ω resistor for this. This resistor is used for bypassing the emitter current.
After selecting all the resistors, we take the coupling capacitor (C1). This capacitor is used for modulating the current going through the transistor. A large value of this is an indication of low frequency, whereas a lesser value shows a higher frequency. We select a 5uF capacitor for C1.
The microphone resistor (R1) is used to limit the current passing through the microphone. This value must be less than the maximum current a microphone can take. In this circuit, the current through the microphone is 0.4mA. The value of Rm = (VCC-Vb)/0.4 = 18.05KΩ. We select a 18KΩ resistor for this. We use an electrolyte capacitor of 15uF as a bypass capacitor (C4), which bypasses the DC signal.
Design of Oscillator Circuit
In the oscillator circuit, we calculate L1 and C6 first. We know the equation of frequency of oscillation is given by
F = 1/(2π√LC)
In this project, our required frequency range is 88MHz to 100MHz. We select a 0.2uH inductor for this. From this, we get the value of C6 which is 12pF. We use a variable capacitor in the range of 5pF to 20pF. For creating vibration, we use the capacitor C9. In this circuit, we use BJT 2N2222. So we take a 5pF capacitor for C9.
Now we have to select the bias resistors R6 and R7. As we have shown the calculation process in the preamplifier design to calculate the bias resistors, we get R6 = 9KΩ and R7 = 40KΩ. For oscillator circuit design, we select a 0.01uF electrolyte capacitor as the coupling capacitor. We also calculate the value of the emitter resistor (R8) with the method we use in the amplifier design. We select a 1KΩ resistor for this.
Design Power Amplifier Circuit
For making a low-power output, we use a class A power amplifier with an LC oscillator in the output. The values of all components in the oscillator circuit remain the same. We use a 20KΩ resistor as the biasing resistor and a 10pF capacitor as the coupling capacitor in this design.
Selection of Antenna
In this circuit, we require a range of about 100m. So we use a stick antenna or a long wire about 30 inches. This length is 1/4th of the transmitting wavelength.
Working Principle of Short-Range FM Transmitter
The microphone is the first input device that takes the audio input. After the first amplification using the common emitter configuration of BC109, the signal is given to the oscillator through the coupling capacitor. A frequency-determined signal is generated by the oscillator of the variable capacitor. The power amplifier transistor using the coupling capacitor is coupled to the output signal from the emitter of the transistor. After amplification of the signal, the variable capacitor in the power amplifier sector is used to maintain the output matched with the oscillator. The RF signal is now transmitted using an antenna.
Applications of Short-Range FM Transmitter
- This circuit can be used at institutions and organisations, to transmit audio signals using FM transmission.
- In hobby projects, we can also use this circuit.
Limitations of This Short-Range FM Transmitter
This is an educational base project. For higher purposes, this requires more approach.


I want dvon microphone circuit diagram
Apart from fm transmitter, can you send me a circuit diagram of the microphone used on public address systems and it’s sensor?
Please what could be the the proper circuit diagram
Very useful
the schematic is wrong right out the gate. The condenser microphone has no powersupply.