An Arduino Based Door Lock System is a project where you can secure your doors with a password. Traditional lock systems which are using mechanical locks are replaced by modern technologies. These techniques are electrical and highly intelligent. These systems are also very efficient than older locks. We can use the door unlocking system as an automated room appliance. Like we open the door and the light and fan of the room turn on.
In this project, we are going to build an Arduino based door lock system with a password feature. This project also provides the control to actuating the load. This system is very easy to use like only with a keypad you can operate it.
In this present day, this system is used to protect secure areas. Where those people can only enter who have passwords or permission to enter. After anyone enters the room the doors locked again. When any other arrives, the system asks for a password. If this person enters the wrong password the doors remain closed.
Project

Circuit Diagram

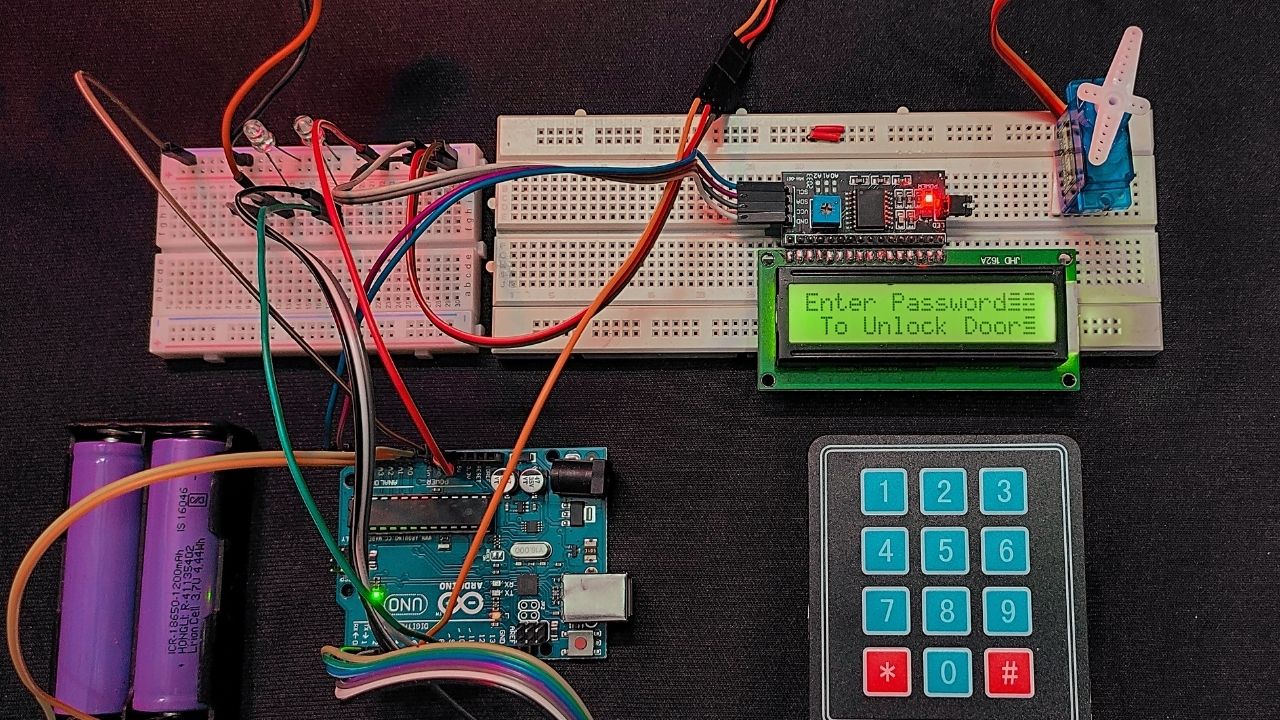
Components Required
- Arduino Nano
- Servo Motor
- 4×3 Keypad
- 16×2 LCD Display
- 10KΩ Potentiometer
- Buzzer
- Veroboard
- 12V Battery
Connection of Arduino Based Door Lock System
Now we are going to explain the circuit diagram of the Arduino based door lock system. At first, we show you the connection between the keypad and Arduino. We used here a 4×3 keypad. Connect all the pins of the keypad to the D1, D2, D3, D4, D5, D6 and D7 pin of the Arduino respectively.
Then we take a servo motor and connect the PWM pin with the D9 pin (PWM Output) of the Arduino. Now the positive part of the buzzer needs to be connected to the D10 pin of Arduino and the negative part will be grounded.
After completing these connections, we started to connect the LCD. Connect pin 2 and pin 15 to the VCC. Then connect pins 4, 6, 11, 12, 13 and 14 of the LCD to the A0, A1, A2, A3, A4 and A5 pin of the Arduino. Connect pin 1, 3, 5, 16 of the LCD display to the ground.
Working Principle of Arduino Based Door Lock System
For my purpose, I used a random password like “1234” by using the keypad.
The working principle is so simple. You just need to enter the password through the keypad provided. If the password is matched with the Arduino, it sends a signal to the servo and the servo rotate 180 degrees and then the door will open. Also, the LCD display shows a message “Access Granted”.
But if the password does not match. The Arduino does not send any signal to the motor and the door remains closed. This time the LCD display shows “Password Incorrect, Dismiss”. The alarm is beep when any of the keys are pressed. You can change all these messages anytime from the code.
Applications of Arduino Based Door Lock System
- This circuit can be used as a door lock like keylocks.
- It can be used at highly secure places to secure important documents.
- With some modifications, this project can be used as a password-based home appliances system.
Advantages of Arduino Based Door Lock System
- This project is very simple.
- The components are very common.
- Less power consumption.
- It is a very simple but good security system.
Disadvantages of Arduino Based Door Lock System
- This circuit can not be used remotely.
- By any chance you forget the password, the door can not be opened.
- Can’t possible to manuall reset the password using keypad. You need to reupload the code with new password using Arduino IDE software.
Arduino Code
To compile the code to the Arduino, we need some libraries. Download the library for the keypad.h from the below.
#include <Keypad.h>
//#include <LiquidCrystal.h> //For LCD Display Without I2C
#include <LiquidCrystal_I2C.h>  //For LCD Display With I2C
#include <Servo.h>
LiquidCrystal_I2C lcd(0x27, 16, 2);
//LiquidCrystal lcd(A0, A1, A2, A3, A4, A5);
Servo myservo;
int pos = 0;
const byte rows = 4;
const byte cols = 3;
char key[rows][cols] =
{
  {'1', '2', '3'},
  {'4', '5', '6'},
  {'7', '8', '9'},
  {'*', '0', '#'}
};
byte rowPins[rows] = {1, 2, 3, 4};
byte colPins[cols] = {5, 6, 7};
Keypad keypad = Keypad(makeKeymap(key), rowPins, colPins, rows, cols);
char* password = "9007";   // Type your desired password here
int currentposition = 0;
int decline = 10;  //Red LED will glow
int grant = 11;  //Green LED will glow
int alarm = 8;   //Buzzer will beep
int invalidcount = 12;
void setup()
{
  displayscreen();
  Serial.begin(9600);
  pinMode(decline, OUTPUT);
  pinMode(grant, OUTPUT);
  pinMode(alarm, OUTPUT);
  myservo.attach(9); //Servo Attached
 //lcd.begin(16, 2);  //For LCD Display Without I2C
 lcd.init();
 lcd.backlight();  //For LCD Display With I2C
}
void loop()
{
  if ( currentposition == 0)
  {
    displayscreen();
  }
  int l ;
  char code = keypad.getKey();
  if (code != NO_KEY)
  {
    lcd.clear();
    lcd.setCursor(0, 0);
    lcd.print("Password");
    lcd.setCursor(7, 1);
    lcd.print(" ");
    lcd.setCursor(7, 1);
    for (l = 0; l <= currentposition; ++l)
    {
      lcd.print("*");
      keypress();
    }
    if (code == password[currentposition])
    {
      ++currentposition;
      if (currentposition == 4)
      {
        unlockdoor();
        currentposition = 0;
      }
    }
    else
    {
      ++invalidcount;
      incorrect();
      currentposition = 0;
    }
  }
}
//OPEN THE DOOR
void unlockdoor()
{
  delay(900);
  lcd.setCursor(0, 0);
  lcd.println(" ");
  lcd.setCursor(1, 0);
  lcd.print("Access Granted");
  lcd.setCursor(4, 1);
  lcd.println("Welcome");
  lcd.setCursor(15, 1);
  lcd.println(" ");
  lcd.setCursor(16, 1);
  lcd.println(" ");
  lcd.setCursor(14, 1);
  lcd.println(" ");
  lcd.setCursor(13, 1);
  lcd.println(" ");
  unlockalarm();
  for (pos = 180; pos >= 0; pos -= 5) //Goes from 180 degrees to 0 degrees
  {
    myservo.write(pos); //Tell servo to go to position in variable 'pos'
    delay(5);
  }
  delay(2000);
  delay(1000);
  counterbeep();
  delay(1000);
  for (pos = 0; pos <= 180; pos += 5) //Goes from 0 degrees to 180 degrees
  {
    myservo.write(pos); //Tell servo to go to position in variable 'pos'
    delay(15);
    currentposition = 0;
    lcd.clear();
    displayscreen();
  }
}
//WRONG PASSWORD
void incorrect()
{
  delay(500);
  lcd.clear();
  lcd.setCursor(1, 0);
  lcd.print("Password");
  lcd.setCursor(6, 0);
  lcd.print("Incorrect");
  lcd.setCursor(15, 1);
  lcd.println(" ");
  lcd.setCursor(4, 1);
  lcd.println("Dismiss");
  lcd.setCursor(13, 1);
  lcd.println(" ");
  Serial.println("Password Incorrect You Are Unauthorized");
  digitalWrite(decline, HIGH);
  digitalWrite(alarm, HIGH);
  delay(3000);
  lcd.clear();
  digitalWrite(decline, LOW);
  digitalWrite(alarm, LOW);
  displayscreen();
}
void clearscreen()
{
  lcd.setCursor(0, 0);
  lcd.println(" ");
  lcd.setCursor(0, 1);
  lcd.println(" ");
  lcd.setCursor(0, 2);
  lcd.println(" ");
  lcd.setCursor(0, 3);
  lcd.println(" ");
}
void keypress()
{
  digitalWrite(alarm, HIGH);
  delay(50);
  digitalWrite(alarm, LOW);
}
void displayscreen()
{
  lcd.setCursor(0, 0);
  lcd.println("Enter Password");
  lcd.setCursor(1 , 1);
  lcd.println("To Unlock Door");
}
void armservo()
{
  for (pos = 180; pos <= 180; pos += 50)
  {
    myservo.write(pos);
    delay(5);
  }
  delay(5000);
  for (pos = 180; pos >= 0; pos -= 50)
  {
    myservo.write(pos);
  }
}
//UNLOCK ALARM
void unlockalarm()
{
  digitalWrite(alarm, HIGH);
  delay(80);
  digitalWrite(alarm, LOW);
  delay(80);
  digitalWrite(alarm, HIGH);
  delay(80);
  digitalWrite(alarm, LOW);
  delay(200);
  digitalWrite(alarm, HIGH);
  delay(80);
  digitalWrite(alarm, LOW);
  delay(80);
  digitalWrite(alarm, HIGH);
  delay(80);
  digitalWrite(alarm, LOW);
  delay(80);
}
void counterbeep()
{
  delay(1200);
  lcd.clear();
  //1
  digitalWrite(alarm, HIGH);
  lcd.setCursor(2, 15);
  lcd.println(" ");
  lcd.setCursor(2, 14);
  lcd.println(" ");
  lcd.setCursor(2, 0);
  delay(200);
  lcd.println("Get In");
  lcd.setCursor(4, 1);
  lcd.print("5");
  delay(200);
  lcd.clear();
  lcd.setCursor(2, 0);
  lcd.println("Get In");
  digitalWrite(alarm, LOW);
  delay(1000);

  //2
  digitalWrite(alarm, HIGH);
  lcd.setCursor(2, 0);
  lcd.println("Get In");
  lcd.setCursor(4, 1);
  lcd.print("4");
  delay(100);
  lcd.clear();
  lcd.setCursor(2, 0);
  lcd.println("Get In");
  digitalWrite(alarm, LOW);
  delay(1000);

  //3
  digitalWrite(alarm, HIGH);
  lcd.setCursor(2, 0);
  lcd.println("Get In");
  lcd.setCursor(4, 1);
  lcd.print("3");
  delay(100);
  lcd.clear();
  lcd.setCursor(2, 0);
  lcd.println("Get In");
  digitalWrite(alarm, LOW);
  delay(1000);

  //4
  digitalWrite(alarm, HIGH);
  lcd.setCursor(2, 0);
  lcd.println("Get In");
  lcd.setCursor(4, 1);
  lcd.print("2");
  delay(100);
  lcd.clear();
  lcd.setCursor(2, 0);
  lcd.println("Get In");
  digitalWrite(alarm, LOW);
  delay(1000);

  //5
  digitalWrite(alarm, HIGH);
  lcd.setCursor(4, 1);
  lcd.print("1");
  delay(100);
  lcd.clear();
  lcd.setCursor(2, 0);
  lcd.println("Get In");
  digitalWrite(alarm, LOW);
  delay(1000);

  //6
  digitalWrite(alarm, HIGH);
  delay(40);
  digitalWrite(alarm, LOW);
  delay(40);
  digitalWrite(alarm, HIGH);
  delay(40);
  digitalWrite(alarm, LOW);
  delay(40);
  digitalWrite(alarm, HIGH);
  delay(40);
  digitalWrite(alarm, LOW);
  delay(40);
  digitalWrite(alarm, HIGH);
  delay(40);
  digitalWrite(alarm, LOW);
  lcd.clear();
  lcd.setCursor(2, 0);
  lcd.print("Relocking");
  delay(500);
  lcd.setCursor(12, 0);
  lcd.print(".");
  delay(500);
  lcd.setCursor(13, 0);
  lcd.print(".");
  delay(500);
  lcd.setCursor(14, 0);
  lcd.print(".");
  delay(400);
  lcd.clear();
  lcd.setCursor(4, 0);
  lcd.print("Door Locked");
  delay(440);
}


Give mi block diagram
It is hard coded to work for only 4-digit passwords. An improvement would be to allow longer passwords.
Also, after say 3 failed attempts, set a long delay before being allowed to try again, which will deter brute force attempts to crack the code.