Are you searching for how you can use an Ultrasonic Sensor with Raspberry Pi Pico over the internet?
Well, your search is over, this is the best article according to your query. We are developing various electronics projects like Arduino, IoT, Home Automation and much more including Raspberry Pi Pico. Previously, we have made some Raspberry Pi projects which include the ultrasonic sensor for the detection or distance measurement. So we thought we should describe a detailed article on how you can use the ultrasonic sensor with Raspberry Pi Pico. You can also check Obstacle Avoidance Robot Using Raspberry Pi Pico for an application with a better understanding.
A microcontroller board called the Raspberry Pi Pico is helpful in multiple projects. One of Pico’s numerous advantages is its ability to communicate with sensors, making it perfect for applications requiring sensing capabilities. The usage of an ultrasonic sensor with the Raspberry Pi Pico will be discussed in this guide.
Using an ultrasonic sensor with a Raspberry Pi Pico can help you build amazing projects that are both innovative and efficient. This combination can be used for a number of goals, including calculating an object’s distance, detecting its presence, and triggering a response based on the object’s distance.
Whether you are a hobbyist or a professional, this powerful combination can help you achieve your goals with ease. Before starting, let’s talk about what ultrasonic sensors and Raspberry Pi Pico are. Because these are the mother component of our discussion. So why are you waiting?
What is an Ultrasonic Sensor?

An Ultrasonic Sensor is an electronic device that uses ultrasound waves to detect objects and measure distances from the object. It triggers high-frequency ultrasound waves and listens for their echoes to calculate the distance of an object. An ultrasonic sensor can be an effective sensor when used with a Raspberry Pi Pico for developing various electronic projects, including robotics, distance measurement, and object detection.
What is a Raspberry Pi Pico?

The Raspberry Pi Pico is an affordable compact microcontroller board that is small, affordable, and powerful. It is based on the RP2040 microcontroller chip and is designed for low-level programming in C/C++. The Pico board has a variety of features like 26 GPIO pins and programmable I/O pins and also supports various types of communication protocols such as SPI, I2C, and UART. It is an ideal choice for building projects which include sensors like the ultrasonic sensor due to its compactness, cheapness, and effectiveness.
Project

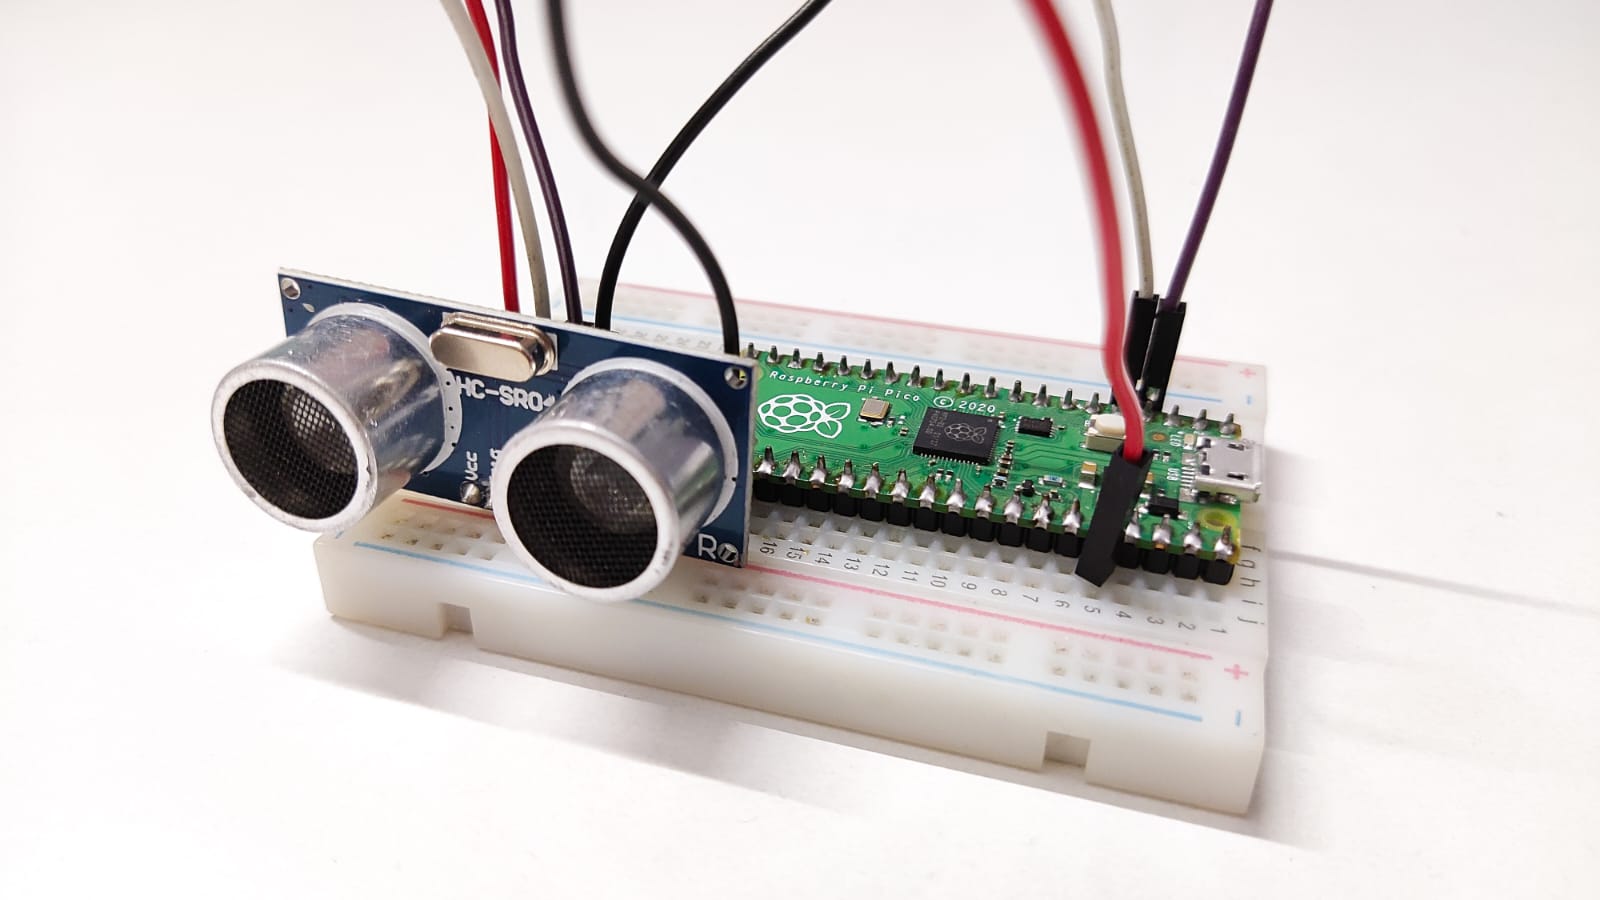
Circuit Diagram

Components Required
- Raspberry Pi Pico Board
- HC-SR04 Ultrasonic Sensor
- Breadboard
- Jumper Wires
- 5V Power Supply
Overall, the components required for using an ultrasonic sensor with a Raspberry Pi Pico are relatively cheap and widely available.
Circuit Connection of Ultrasonic Sensor With Raspberry Pi Pico
Now that we have all the required components, let’s connect both components on a breadboard. Here’s how to connect it up:
- Connect the VCC pin on the ultrasonic sensor to 5V on the Pico
- Connect the GND pin on the ultrasonic sensor to GND on the Pico
- Connect the TRIG pin on the ultrasonic sensor to GP14 on the Pico
- Connect the ECHO pin on the ultrasonic sensor to GP15 on the Pico
Code for Ultrasonic Sensor With Raspberry Pi Pico
After connecting all the hardware, let’s move on to the coding part. We will be using micro python (Thonny) for this project.
from machine import Pin
import utime
trigger = Pin(3, Pin.OUT)
echo = Pin(2, Pin.IN)
def ultra():
   trigger.low()
   utime.sleep_us(2)
   trigger.high()
   utime.sleep_us(5)
   trigger.low()
   while echo.value() == 0:
       signaloff = utime.ticks_us()
   while echo.value() == 1:
       signalon = utime.ticks_us()
   timepassed = signalon - signaloff
   distance = (timepassed * 0.0343) / 2
   print("The distance from object is ",distance,"cm")
while True:
   ultra()
utime.sleep(1)Save the code to the Raspberry Pi Pico as code.py.


Then click on the green run button to run the code. In the Python Shell, you will see the distance printed every second.

This code configures two pins for the trigger and echo signals as well as initialises the ultrasonic sensor. The function distance() is then defined, and it uses sound waves to determine an object’s distance from the sensor. Finally, it enters a loop that keeps printing the sensor’s distance readings every second.
Testing The Ultrasonic Sensor
To test the ultrasonic sensor, run the Python code on the Raspberry Pi Pico board. You should see the distance between the sensor and the obstacle printed on the console. You can place obstacles of different distances from the sensor to test their accuracy.
Conclusion
In this article, we have learned how to use an ultrasonic sensor with the Raspberry Pi Pico. We have discussed the hardware required, circuit connection, and Raspberry Pi code for measuring distances using the ultrasonic sensor. With this knowledge, you can now use ultrasonic sensors in your own Raspberry Pi Pico projects.
FAQs
Can I use multiple ultrasonic sensors with a Raspberry Pi Pico board?
Yes, you can use multiple ultrasonic sensors by connecting each sensor to a different GPIO pin on the Pico board with a slight change of code.
What is the maximum distance that an ultrasonic sensor can measure?
The maximum distance that an ultrasonic sensor can measure depends on the specific sensor you are using. However, most sensors can measure distances up to several meters.
Can I use a different programming language to use the ultrasonic sensor with the Raspberry Pi Pico?
Yes, you can use other programming languages like C++ or MicroPython to write the code for the ultrasonic sensor.
What other types of sensors can I use with the Raspberry Pi Pico?
There are various types of sensors you can use with the Raspberry Pi Pico, including temperature sensors, humidity sensors, light sensors, and more.
Can I use the ultrasonic sensor to detect objects in real-time for robotics projects?
Yes, you can use the ultrasonic sensor to detect objects in real-time for robotics projects. You can write code to continuously measure the distance and use that information to control the robot’s movements.