In this project, we are going to build a Tasmota Home Automation System with Alexa controlled features. Here we use the ESP8266 NodeMCU module as it is cheaper than ESP32. With the help of this project, we can operate 4 home appliances through the Tasmota dashboard, Alexa device and also physical switches. We can also operate this system by controlling the relays from the Alexa app from anywhere in the world. Internet issue is common in rural areas. So if there is no internet you can operate those appliances by manual switches.
Also, we don’t need to buy Alexa devices or any other smart devices for this home automation system. Because I made this project using all low-cost tools.
You just need to follow all the steps carefully. After this, you can easily make an Alexa Smart Home Automation System using Tasmota and Alexa to control the appliances using just your voice commands.
Must Read Home Automation Projects for Engineering Students
What is Tasmota?
Tasmota is a custom open-source firmware that can be run on ESP8266 and ESP32 development boards. We can connect devices as a local control via MQTT, HTTP, etc. At first, Tasmota is made for Sonoff smart devices but these days it is modified for free-source projects. Now it is a very effective and easy software for controlling the ESP chips. We can control many sensors by just using them. The main advantage of Tasmota is you can add or remove devices at any time which is not listed on built-in devices.
Project
Circuit Diagram
Components Required
- NodeMCU ESP8266 Board
- PC817C Optocoupler (x4)
- 5 Volt Relay Module (x4)
- 1K Resistor (x4)
- 1N4007 Diode (x4)
- LEDs (x4)
- Push Buttons (x4)
- 5 Volt Power Supply
- Veroboard
How to Flash Tasmota with ESP8266
There are two ways to flash Tasmota. The first process is the OTA (Over the Air) and the second one is FTDI or Arduino IDE. In this project, we use Arduino IDE to flash Tasmota on the ESP8266 development board.
Now we started with the connection of all components used in this project. You can connect ESP8266-01 with Arduino Uno as shown in the diagram.
Now connect VCC and GND of ESP-01 to 3.3V and GND of Arduino. Then connect CH_PD to 3.3V. Connect GPIO_0 pin to the GND of Arduino.
Now connect RX and TX of the ESP-01 to the RX and TX of the Arduino UNO. After connecting ESP8266-01, connect the reset pin of Arduino to the GND to bypass it. This technique disabled Arduino and firmware directly uploaded to the ESP8266 board. When the blue LED glows you can remove the RST pin from the GND pin.
How to Download & Install Tasmota Firmware?
Now the question is how to download Tasmota firmware. You can click this link – http://ota.tasmota.com/tasmota/release/. In this link, you can see a list of firmware files. All files have different built-in drivers for different sensors. You can use ‘tasmota.bin’. This file has all features of compatible hardware. After visiting the link you just need to scroll down and click on the first option and then click on Tasmotizer-1.2.exe.


Tasmotizer
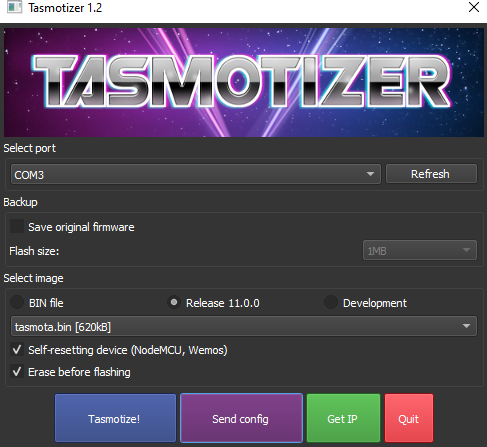
The Tasmotizer is a tool for flashing Tasmota. You have to download the “latest Tasmota version” on your platform. Now just double-click on it and it will start.
Process for Flashing Tasmota
Now we are in the final part to flash Tasmota. Select the port where Arduino UNO is connected. Browse the Tasmota firmware binary you download. Then click Tasmotize. After a few times, it will be done.
How to Configure WiFi?
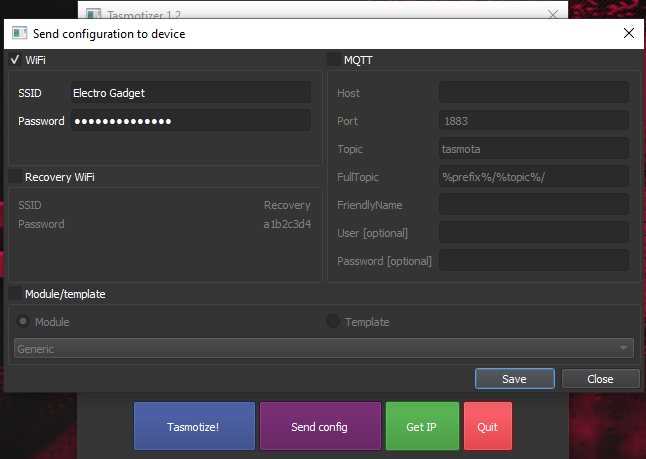
After Flashing Tasmota, we have to configure WiFi to control appliances by the Amazon Alexa app. After Flashing, you can see a ‘send config’ button. Click on it. Now enter your WiFi name and password and save it and now click on OK. Saving the process may take some time.
After 5 to 10 seconds later, you are able to next step. Now click on ‘get IP’. Here you can see the IP address of the WiFi. Copy it and paste it on Google or any browser. There you can see the dashboard where you can edit your project.


Configure Relays and Switches for Tasmota Home Automation System
Now click on ‘Configuration’ and then click ‘Configure module’. Now select the ‘Generic(0)’ and save it. Then return to the main menu and click on ‘Configuration’. Here you can see the ‘Generic (0)’ is selected. You have to configure all the GPIO pins connected to the relays.

Relay 1, 2, 3, 4 are connected to the pins D1, D2, D5 and D6 respectively and switches are connected to the pins SD3, D3, D7 and RX respectively. Then open the browser and select relay 1 in the GPIO5 for relay 1. Then do the same for GPIO4 and select relay 2. The same process is for relays 3 and 4 respectively.

Now the time is to connect the switches. At first, we can see the SD3 pin or GPIO10 is connected to switch 1. Now as I show you in the previous selection technique, select switch for the GPIO10 if you use manual switches or select buttons if you use push buttons. By this process select all four switches respectively.
Now save it and back to the main menu. In the dashboard, you can see four buttons. With these buttons, you can control these four relays.
Configure Amazon Alexa for Tasmota Home Automation System
To configure the Alexa app you have to back to the main menu. Select ‘Configuration’ and then ‘Configure other’. Now name this project and name all four channels. By these names, Alexa will identify this device. At last select ‘Hue bridge multi device’ and save it.

Step for Setup Amazon Alexa Mobile Application
- In the Alexa app, sign in with the email and password.
- Then Close it.
- Click on Discover Devices. Your device name is visible there in a few seconds.
- Then click on your device. Then select all the switches.
- If ESP8266 is connected with your WiFi, you can control all appliances from the Alexa app.
- Now you just need to say “Alexa, Turn On the light”. The light is on. With this voice command, you can control appliances using your voice.


Operation of Tasmota Home Automation System
The working principle is so easy for this project. You just need to say “Alexa turn on switch 1” and the switch is turned on. By this process, you can control four switches. You can also control it with the Alexa app.
When you have no WiFi connections, this project can be controlled manually by switches. When WiFi is connected, the Alexa app will show the notification of your appliances.
Advantages of Tasmota Home Automation System
- You can turn ON/OFF loads using your voice command.
- Increase or decrease the brightness of your room lights.
- You can also change the colour of the lights.
- You can check the room temperature by sensors.


Which type of LOLIN you used ? can you find concrete module on aliexpress and send me a link please?