Are you looking for a DIY automation project that combines Arduino, IR sensors, and smart light control? A Bidirectional Visitor Counter is a fascinating electronics project that not only counts the number of people entering and exiting a room but also automatically turns the lights ON/OFF based on occupancy.
This project is perfect for home automation, energy saving, and smart classrooms or offices. In this article, you’ll learn how to build a Bidirectional Visitor Counter with Light Control using Arduino, complete with circuit diagrams, code, and explanation.
What is a Bidirectional Visitor Counter?
A Bidirectional Visitor Counter is a system that counts people entering and leaving a space. The main feature is its ability to track the direction of movement—whether someone is coming in or going out. With this logic, the system can keep track of the number of people currently in the room.
When connected to a light control circuit, the system can automatically turn ON the light when someone enters and turn it OFF when the room is empty.
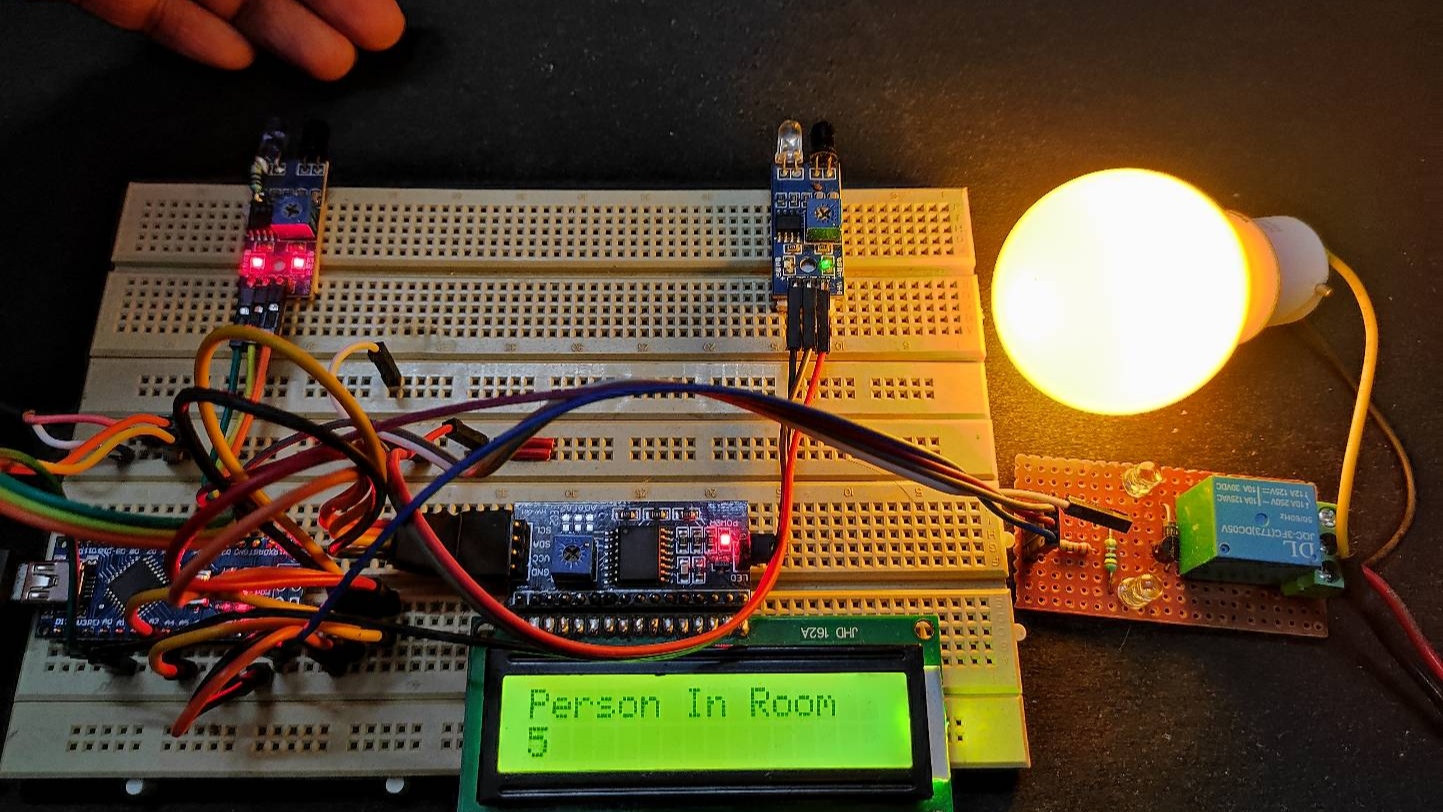
Project
")
Circuit Diagram
")
Components Required
- Arduino Nano
- 16×2 LCD Display
- IR Sensor Module (x2)
- 5V Relay
- BC547 NPN Transistor
- Resistor (1KΩ, 220Ω)
- Hi-Link 5V AC-DC Converter (Optional)
- AC Source
Circuit Explanation
The project of “Bidirectional Visitor Counter” is based on the interfacing of some components such as sensors, microcontroller, counter display and gate.
Sensor Part: In this part, we have used two IR sensors which contain IR LEDs, Photo Diodes, potentiometer, comparator (Op-Amp) and LEDs. The potentiometer is used here for setting up reference voltage at the comparator’s one terminal and IR sensors sense the object or person and provide a certain change in voltage at the comparator’s second terminal. Then comparator compares both these voltages and generates a digital signal at the output terminal. Here we have used two comparators for two sensors. LM358 is used as a comparator. LM358 has inbuilt two low noise Op-Amp.
Control Part: Arduino is used for controlling the whole process of this bidirectional visitor counter. The outputs of comparators are connected to pin 14 and pin 19 of the Arduino. Arduino then read these signals and send commands to the relay module to drive the load for control.
Counter Display Part: The display part contains a 16×2 LCD display. This section will show the counted number of people entering or exiting from the room and light status when no one will be in the room.
Relay Module Part: The relay module consists of a BC547 NPN transistor and a 5-volt relay for controlling the load (light bulb). Transistor is used to drive the relay because Arduino does not supply the required voltage and current to drive the relay. So we have added a transistor in this circuit to get enough voltage and current for the relay. Arduino sends signals to this driver transistor and then the light bulb will turn on and off accordingly.
How the Bidirectional Visitor Counter Works?
The Bidirectional Visitor Counter system relies on two IR (Infrared) sensors, a microcontroller (Arduino), and a relay module to achieve accurate people counting and smart light automation.
Let’s break it down step-by-step:
1. IR Sensors Placement and Role
You need two IR sensor pairs (IR transmitter and receiver) installed side-by-side at the entrance of a room or hallway, spaced a few inches apart. Here’s how they function:
- IR Sensor 1 (S1) is placed closer to the entrance.
- IR Sensor 2 (S2) is placed slightly inside the room.
These sensors act as digital switches:
- When no object is detected → Output: HIGH
- When an object (like a person) blocks the IR beam → Output: LOW
2. Detecting Direction of Movement
The sequence in which the IR sensors are triggered helps determine the direction of movement:
Entry Detection Logic
If a person walks into the room:
- Sensor 1 is triggered first (IR beam interrupted).
- Then Sensor 2 is triggered.
- Arduino identifies this sequence as entry.
- Counter is incremented by +1.
Exit Detection Logic
If a person walks out of the room:
- Sensor 2 is triggered first.
- Then Sensor 1 is triggered.
- Arduino identifies this sequence as exit.
- Counter is decremented by -1.
3. Counting People in the Room
The Arduino uses a simple integer variable called count to track how many people are currently in the room:
- When someone enters,
count++(increment) - When someone leaves,
count--(decrement) - The count is never allowed to go below zero (i.e., negative count is corrected to 0)
This logic ensures an accurate real-time count of room occupancy.
4. Automatic Light Control with Relay
The real value of this project comes from automated light control based on the people count:
- If
count > 0:
→ There’s at least one person inside the room
→ Arduino activates the relay, turning ON the light - If
count == 0:
→ Room is empty
→ Arduino deactivates the relay, turning OFF the light
The relay module acts like a digital switch that controls AC appliances (e.g., a light bulb), safely isolated from Arduino.
Features & Benefits
1. Accurate Bidirectional People Counting
This system uses two IR sensors to detect the direction of movement—one for entry and the other for exit—making it a true bidirectional visitor counter. By analysing the sequence in which the sensors are triggered, it accurately tracks how many people are in the room at any given time, avoiding false counts and ensuring reliable occupancy data.
2. Automatic Light Control Based on Occupancy
The integrated light control automatically switches the light ON when someone enters and OFF when the room becomes empty. This intelligent automation reduces energy wastage and is ideal for home, office, or classroom environments where lights are often left on unintentionally.
3. Contactless and Fully Automated Operation
The system requires no manual interaction—thanks to IR sensors, all detections happen automatically and without touch. This makes it convenient, hygienic, and user-friendly, especially in areas where frequent contact with switches is undesirable, such as hospitals or public restrooms.
4. Cost-Effective and Easy to Build
Built using simple, low-cost components like Arduino, IR sensors, and a relay, this project is both affordable and easy to assemble—even for beginners. It doesn’t require complex wiring or soldering, making it perfect for DIY enthusiasts and students.
5. Scalable and Educational
While the basic version handles counting and light control, the system can easily be expanded with an LCD display, buzzer, or IoT features. It’s a great project for learning about automation, embedded systems, and real-world problem solving with Arduino.
Applications of Bidirectional Visitor Counter
- Smart Home Automation: Automatically turns lights, fans, or appliances ON/OFF based on room occupancy to save electricity.
- Office & Meeting Room Management: Tracks real-time occupancy for efficient space usage, automatic lighting, and HVAC control.
- Retail Store Footfall Analysis: Monitors customer traffic for performance insights, staff planning, and energy-efficient lighting.
- Classroom or School Automation: Helps manage lighting and fans based on student presence and can provide occupancy data for scheduling.
- Hospital Room Monitoring: Enhances patient safety and energy efficiency by tracking room usage and triggering alerts when needed.
Arduino Code Without I2C Module
#include<LiquidCrystal.h>
//#include <Wire.h>                  //for LCD I2C Module
//#include <LiquidCrystal_I2C.h>
//LiquidCrystal_I2C lcd(0x27, 16, 2);
LiquidCrystal lcd(13,12,11,10,9,8);  //for LCD without I2C Module
#define in 14
#define out 19
#define relay 2
int count=0;
void IN()
{
    count++;
    lcd.clear();
    lcd.print("Person In Room");
    lcd.setCursor(0,1);
    lcd.print(count);
    delay(1000);
}
void OUT()
{
  count--;
    lcd.clear();
    lcd.print("Person In Room");
    lcd.setCursor(0,1);
    lcd.print(count);
    delay(1000);
}
void setup()
{
 // lcd.init();                  //for LCD with I2C Module
 // lcd.backlight();
  lcd.begin(16,2);               //for LCD without I2C Module
  lcd.print("Visitor Counter");
  delay(2000);
  pinMode(in, INPUT);
  pinMode(out, INPUT);
  pinMode(relay, OUTPUT);
  lcd.clear();
  lcd.print("Person In Room");
  lcd.setCursor(0,1);
  lcd.print(count);
}
void loop()
{

  if(digitalRead(in)==0)
  IN();
  if(digitalRead(out)==0)
  OUT();

  if(count<=0)
  {
    lcd.clear();
    digitalWrite(relay, LOW);
    lcd.clear();
    lcd.print("Nobody In Room");
    lcd.setCursor(0,1);
    lcd.print("Light Is Off");
    delay(200);
  }

  else
    digitalWrite(relay, HIGH);

}Arduino Code With I2C Module
#include<LiquidCrystal.h>
#include <Wire.h>
#include <LiquidCrystal_I2C.h>
LiquidCrystal_I2C lcd(0x27, 16, 2);
#define in 14
#define out 15
#define relay 2
int count=0;
void IN()
{
    count++;
    lcd.clear();
    lcd.print("Person In Room");
    lcd.setCursor(0,1);
    lcd.print(count);
    delay(500);
}
void OUT()
{
  count--;
    lcd.clear();
    lcd.print("Person In Room");
    lcd.setCursor(0,1);
    lcd.print(count);
    delay(500);
}
void setup()
{
  lcd.init();
  lcd.backlight();
  lcd.print("Visitor Counter");
  delay(500);
  pinMode(in, INPUT);
  pinMode(out, INPUT);
  pinMode(relay, OUTPUT);
  lcd.clear();
  lcd.print("Person In Room");
  lcd.setCursor(0,1);
  lcd.print(count);
}
void loop()
{

  if(digitalRead(in)==0)
  IN();
  if(digitalRead(out)==0)
  OUT();

  if(count<=0)
  {
    lcd.clear();
    digitalWrite(relay, LOW);
    lcd.clear();
    lcd.print("Nobody In Room");
    lcd.setCursor(0,1);
    lcd.print("Light Is Off");
    delay(200);
  }

  else
    digitalWrite(relay, HIGH);

}FAQs About Arduino Bidirectional Visitor Counter
What is the use of a bidirectional visitor counter?
A bidirectional visitor counter using Arduino is a smart system that tracks the number of people entering and exiting a room using IR sensors and an Arduino microcontroller. It can also control lights automatically based on occupancy.
How does a bidirectional visitor counter work?
The system uses two IR sensors placed at the entrance. When someone enters, the sensors detect the direction and increment a counter; when someone exits, the counter is decremented. If the count is greater than zero, lights turn ON; otherwise, they turn OFF.
What are the components required for a visitor counter project?
To build a visitor counter project with light automation, you’ll need an Arduino Uno, two IR sensor modules, a relay module, jumper wires, a breadboard, and a light bulb or LED.
Where can a bidirectional visitor counter be used?
A bidirectional visitor counter can be used in homes, classrooms, offices, retail stores, hospitals, and more. It helps in automating lighting, saving energy, and monitoring occupancy in real-time.
Can I use Arduino to automate lights based on room occupancy?
Yes! Arduino can be programmed with IR sensors and a relay module to detect occupancy and control lights automatically, making it ideal for home automation projects.
Conclusion
A Bidirectional Visitor Counter with Light Control using Arduino is not just a fun DIY electronics project—it’s a practical solution for real-world problems like energy conservation and automation. Whether you’re a student, maker, or tech enthusiast, this project is a perfect Arduino-based automation solution to dive into.
Ready to build yours? Drop a comment below if you have questions or need help!


Check on our website. I will definitely post the video in this article.
My I have a video for the automatic room light controller with bidirectional visitor counter project
we do this circuit last 2 year ago